Ordinarily, applying a created piece of clothing to the body forces you, with limited ability to shorten or lengthen the extremities, to make a solid piece. However, if you use Alpha Channels, you can make a layer's contents partially transparent.
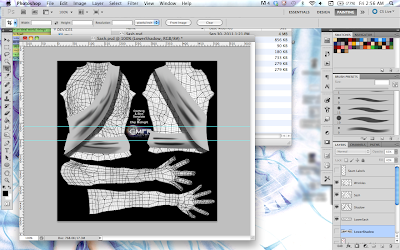
Case-in-point, consider the sash I created and demonstrated in class. Let me re-create it for you here:
Step One - Grab That Template
Select a template. You can find these online, but try to get a PSD file since these give you the most control.
In this case, since I'm making a sash, I chose an upper-body template.
Step Two - Make Some Clothes
The next step is to create the texture for the clothing layer.

Note that this will probably take several tries to get something half-way convincing, so be prepared to repeat the next few steps MANY times as you revise your piece of clothing.
Step Three - Alpha Channel
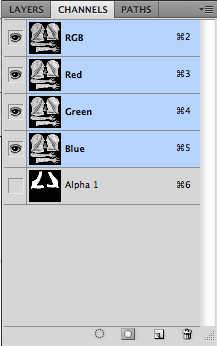
Create a new Alpha Channel.

This will act as a mask, so simply "mask out" the parts you want to be invisible, i.e. anything that ISN'T the clothing itself. (Note: If either your mask or your texture goes outside the bounds of the diagram, don't worry - Second Life automatically crops off anything that isn't on the body grid.)
Step Four - Export Your Pattern
Now, select Save As from the File menu. Choose a name and choose Targa format. (.tga). Make sure the Alpha Channel box is checked.
When the following dialogue opens, select the following setting:
(Note that if you did NOT use an Alpha Channel, select 24 bits/pixel instead).
Click OK.
Step Five - Bringing It Home
Open Second Life and login. Select Build>Upload>Image. (Make sure you have at least L$10).
Verify that it's the file you want and click OK. You will be charged L$10 and the file will be added to your Texture inventory.
Step Six - Applying the Texture
Next, go to your Appearance menu an edit your current outfit. Mouse over whichever type of article of clothing your design best fits (bearing in mind the "hierarchy"), right-click it and select "Create New [whatever]". (In this case, I chose a jacket, as it is outermost on the upper body.)
Name the new object, then select the upper (and/or Lower) texture box to import from.
In your inventory, select the recently imported texture(s). Click OK.
Step Seven - Finishing Up
Now it's time to remove the kinks. First, double-check all the settings to make sure that no more and no less of your clothing is shown - in this case, an open "jacket" would leave a huge gap in my sash. Then, if you chose to keep your texture grayscale, you can edit its color using the color menu:
Once everything's finished, select Save. Congrats - you now have a new piece of clothing!


No comments:
Post a Comment